Thursday, March 9, 2017
Sunday, March 5, 2017
Bathroom 2
So, I introduced you to Bathroom 2 in my first post. I encourage you to read that one first to get the history. But here's the beginning chapter of its story.
Logistics: we've got lovely brown floor tiles, a white and brown larger than life standing shower, 90's glass blocks, white laminate, a "etched" mirror and standard vanity lighting. What we have is a complete redo here.


I wasn't planning on starting with this bathroom. I didn't have a choice. I received an email from my management company saying that my unit is leaking into the hallway (Oh hello home ownership, nice to meet you.) Several handymen and a plumber later, I've learned that the tile is shot and I've got to completely redo the shower.
Why just do the shower? Let's do the whole bathroom!
Originally this room to me was the guest bedroom/roomate's room. But I'm leaning towards converting this to the master for a few reasons. 1. This room is more secluded than the first bedroom (sorry future roommate, you'll get to live behind the kitchen but in another amazing room regardless) 2. It already has hardwood floors 3. This bathroom is going to be amazing. End of story.
Step 1: Kelli takes a Friday night trip to the Tile Outlet (#adulting)
So, I venture over to the Tile Outlet. This place is great. Not fancy, no showroom. Just tile stacked everywhere. And I went without a plan (this may not be the best plan for a remodel). But oh, how I loved this Friday night.
I started by explaining to the tile people that I have a curved wall in this standing shower (the building has a lot of cement poles that hold the building up) and needed to know which tiles could accommodate such a curve. So immediately, he says, we've got to go Subway tiles. Ok, duh. Love those. Easy. (A subway tile is a classic rectangular shaped tile found in the iconic NYC subway stations)
(I'm hoping my photography skills will improve over the course of these projects!)

I love white. You'll learn this quickly when we get to the kitchen. I didn't know (remember no plan in place before getting to this store) that I would go with white for this bathroom. But I loved the white subway tiles, all 7 colors of white. Yes, that's right. There are multiple shades of white. And they all look alike but are different in slight variations... So I picked one and just went with it. So we will have a subway tiled wall for the shower.
Now here's where I get creative. I knew I wanted some type of accent tile to add a little interest and I absolutely knew I wanted a hexagon shaped floor.
Like I mentioned, much of my inspiration lives in my mind and comes from places I've been. I was in a bathroom at a restaurant in Jackson Hole, Wyoming. (Shout out to Teton Tiger - your ladies bathroom was my inspiration for this flooring.) I did not take a photo (probably should have) but for some reason I loved the flooring and it came back to me while tile shopping. It was small hexagons with a dark grout. Seemed durable and didn't show much wear. So enter, my plan for my own bathroom floor below. Also, they had navy walls. We'll get to this later.

For the accent, I wanted something that would pop but not take away from the classic, clean lines of the subway tile. I found this one. Just went with it. No real inspiration or ideas really.


I chose a dark grey grout. So the tiles will pop. And the grout won't show wear or stain.
Step 2: Fixtures
With all the white, I wanted to do something that would bring a more relaxed vibe to this space. I wanted bronze, all the oil-rubbed bronze. (Isn't this going out of style? Maybe. But it's going to be great, so bear with me for a moment). I didn't want to go classic silver. I want unique. I want a more rustic feel for this space. And I want it to be me. You're going to love it.
So I went on the hunt for oil-rubbed bronze fixtures. We're talking shower head, sink faucet, shower door detailing, lighting. This wasn't the easiest to find in person. I went to the big box stores and was able to find a handful of options but none in stock in the store. So I went online. This was overwhelming but I narrowed it down to Moen, Delta and Kohler (recommendations from a Florida neighborhood plumber) and picked the style I envisioned in my mind.

Step 3: The Vanity and Mirror
So here's where things get fun. I wanted a pre-made vanity (mainly because I didn't want to have one custom built for this bathroom) and I wanted to conserve cost both with cabinets and stone countertops. I wanted it to be functional, look pretty, and match my style. I wanted grey. (I know you're thinking, we've got white, we've got bronze, and now we've got grey. And she's mentioned navy. What is she thinking?) Again, I think you're going to love it.
So, after hours and hours of looking at online retailers. I went with Costco for this one. It has good reviews (important), it was on sale (important), and it matched the colors I wanted. The cabinetry is a dark grey and the countertop is a white and grey marble. I had this delivered (note Costco does not deliver inside and I begged them to put it in my garage, which they did). Shout out to my amazing tenants, for hauling up this 300+ pound vanity to my unit. You are lifesavers.
I will decide if I'm going to change the hardware. Many of you know, I hate matchy-matchy. So we'll see how I feel about it once it's in place together.

I purchased the vanity lighting from Lowe's. I liked the style and the quality seems good. The faucet is from the Kohler Georgeson line and fits the overall look I want. (Both not on sale..)
I have purchased a mirror for above the vanity from Homegoods. It has a distressed, dark grey frame. And it cost $35 (!!!) This may or may not be my final choice so I'll wait to reveal once it's completed.
I love the Color Blackboard from the Magnolia Homes line. I saw this color in person when I visited the Silos in Waco last summer and has been on my mind ever since. It's basically black with navy undertones. I may incorporate it in this space somehow. But don't fret, you'll see it in another room soon.
Step 4: Construction. Begins next week. I should have demo and final photos very soon! Stay tuned! Fingers crossed we don't run into any surprises.
Next up, fireplace overhaul. I know, you cannot wait.
xo, -Kelli
Logistics: we've got lovely brown floor tiles, a white and brown larger than life standing shower, 90's glass blocks, white laminate, a "etched" mirror and standard vanity lighting. What we have is a complete redo here.


I wasn't planning on starting with this bathroom. I didn't have a choice. I received an email from my management company saying that my unit is leaking into the hallway (Oh hello home ownership, nice to meet you.) Several handymen and a plumber later, I've learned that the tile is shot and I've got to completely redo the shower.
Why just do the shower? Let's do the whole bathroom!
Originally this room to me was the guest bedroom/roomate's room. But I'm leaning towards converting this to the master for a few reasons. 1. This room is more secluded than the first bedroom (sorry future roommate, you'll get to live behind the kitchen but in another amazing room regardless) 2. It already has hardwood floors 3. This bathroom is going to be amazing. End of story.
Step 1: Kelli takes a Friday night trip to the Tile Outlet (#adulting)
So, I venture over to the Tile Outlet. This place is great. Not fancy, no showroom. Just tile stacked everywhere. And I went without a plan (this may not be the best plan for a remodel). But oh, how I loved this Friday night.
I started by explaining to the tile people that I have a curved wall in this standing shower (the building has a lot of cement poles that hold the building up) and needed to know which tiles could accommodate such a curve. So immediately, he says, we've got to go Subway tiles. Ok, duh. Love those. Easy. (A subway tile is a classic rectangular shaped tile found in the iconic NYC subway stations)
(I'm hoping my photography skills will improve over the course of these projects!)

I love white. You'll learn this quickly when we get to the kitchen. I didn't know (remember no plan in place before getting to this store) that I would go with white for this bathroom. But I loved the white subway tiles, all 7 colors of white. Yes, that's right. There are multiple shades of white. And they all look alike but are different in slight variations... So I picked one and just went with it. So we will have a subway tiled wall for the shower.
Now here's where I get creative. I knew I wanted some type of accent tile to add a little interest and I absolutely knew I wanted a hexagon shaped floor.
Like I mentioned, much of my inspiration lives in my mind and comes from places I've been. I was in a bathroom at a restaurant in Jackson Hole, Wyoming. (Shout out to Teton Tiger - your ladies bathroom was my inspiration for this flooring.) I did not take a photo (probably should have) but for some reason I loved the flooring and it came back to me while tile shopping. It was small hexagons with a dark grout. Seemed durable and didn't show much wear. So enter, my plan for my own bathroom floor below. Also, they had navy walls. We'll get to this later.

For the accent, I wanted something that would pop but not take away from the classic, clean lines of the subway tile. I found this one. Just went with it. No real inspiration or ideas really.


I chose a dark grey grout. So the tiles will pop. And the grout won't show wear or stain.
Step 2: Fixtures
With all the white, I wanted to do something that would bring a more relaxed vibe to this space. I wanted bronze, all the oil-rubbed bronze. (Isn't this going out of style? Maybe. But it's going to be great, so bear with me for a moment). I didn't want to go classic silver. I want unique. I want a more rustic feel for this space. And I want it to be me. You're going to love it.
So I went on the hunt for oil-rubbed bronze fixtures. We're talking shower head, sink faucet, shower door detailing, lighting. This wasn't the easiest to find in person. I went to the big box stores and was able to find a handful of options but none in stock in the store. So I went online. This was overwhelming but I narrowed it down to Moen, Delta and Kohler (recommendations from a Florida neighborhood plumber) and picked the style I envisioned in my mind.

I found the shower door online, correct color (important), frameless and clear (important and I want the tile work to be seen) and it was on sale (important). Done.
I went with Delta for the shower fixtures. Mainly because I saw these in person and liked the color and size. These were not on sale (many are not) so I picked these based on style only.
Step 3: The Vanity and Mirror
So here's where things get fun. I wanted a pre-made vanity (mainly because I didn't want to have one custom built for this bathroom) and I wanted to conserve cost both with cabinets and stone countertops. I wanted it to be functional, look pretty, and match my style. I wanted grey. (I know you're thinking, we've got white, we've got bronze, and now we've got grey. And she's mentioned navy. What is she thinking?) Again, I think you're going to love it.
So, after hours and hours of looking at online retailers. I went with Costco for this one. It has good reviews (important), it was on sale (important), and it matched the colors I wanted. The cabinetry is a dark grey and the countertop is a white and grey marble. I had this delivered (note Costco does not deliver inside and I begged them to put it in my garage, which they did). Shout out to my amazing tenants, for hauling up this 300+ pound vanity to my unit. You are lifesavers.
I will decide if I'm going to change the hardware. Many of you know, I hate matchy-matchy. So we'll see how I feel about it once it's in place together.

I purchased the vanity lighting from Lowe's. I liked the style and the quality seems good. The faucet is from the Kohler Georgeson line and fits the overall look I want. (Both not on sale..)
I have purchased a mirror for above the vanity from Homegoods. It has a distressed, dark grey frame. And it cost $35 (!!!) This may or may not be my final choice so I'll wait to reveal once it's completed.
I love the Color Blackboard from the Magnolia Homes line. I saw this color in person when I visited the Silos in Waco last summer and has been on my mind ever since. It's basically black with navy undertones. I may incorporate it in this space somehow. But don't fret, you'll see it in another room soon.
Step 4: Construction. Begins next week. I should have demo and final photos very soon! Stay tuned! Fingers crossed we don't run into any surprises.
Next up, fireplace overhaul. I know, you cannot wait.
xo, -Kelli
Introduction and The Before
Disclaimer: I am not a professional designer or writer. I know there are tons of home design blogs out there. This is my first journey with home design, renovation, and flipping. Many of my ideas come from my mind and places that I've been, so I'm documenting this process for my own self, but I'm happy that you've chosen to follow along!
The Personal: For those of you who know me, you know I haven't stayed put in a place for more than two years (since finishing college). I don't know if it's always the desire for something new or the fact that there's another city and another journey always to be had that gets me closer to finding the true place I'll call home. Sometimes my heartstrings pull me back towards places I have lived (oh how I miss my favorite city DC and crave the beaches of Florida) and sometimes it calls me to want to go somewhere new and unexpected (I've always imagined I'll live in the mountains). Hence the name for this blog. I'm wandering, but I'm not lost. And maybe, just maybe, I'll buy homes along the way.
So let's skip to the present, December 2016 marked 2 years in Chicago. Instead of picking up and moving, I did it. I bought a house. I truly love Chicago. I love the city, I love the people, I love what I have experienced here and I love the person Chicago has shaped me to be. Does this mean I'll stay put in Chicago? Who knows. Does it mean I'll call this home? I'm honestly not sure. But what it does mean is that I get to do something I love. I bought a fixer upper and I get to design and redo it from the floors up. (Insert - what have I gotten myself into?!)
I have always beenfascinated (ok obsessed) with houses and interior design. I can walk into a space and just see its potential. I can see where the kitchen should be, what it should look like, the perfect place to hang the TV and the color schemes for the entryway. I've had friends and family say, "you've really got a knack for this" or "please help me decorate my living room" or "what color should I paint my walls?" or "how do I make this bookshelf look better?" So maybe, I am good at this? Or maybe I just think I am. We'll see. I'm not artistic by any means and I know not everyone will favor my designs. But you'll get to see them here and that is something I am proud of.
The House: So, let me introduce you to my place. For the sake of this blog, I'm going to call it the West Loop Recreate. I'm going to recreate this home and not completely redo it. Why? Because this house has a story and really good bones. It's the reason why I loved it the second I stepped foot inside the door.
The building (I will not disclose location or show photos of the outside - I'm not looking for stalkers here...): used to be a textile factory. It was built after the Great Chicago Fire when most (from what I understand) factories moved and rebuilt on the West side of the city. More true history can be found here http://westloop.org/about/history/. Anyway, the building, according to the Chicago Tribune was built sometime around 1885 (says a plumber who investigated the building before they turned it into condos) and was converted into condos in 1989. So it's old, really old. And I can only imagine holds many stories within its walls. It is filled with concrete, exposed brick, an industrial elevator and tons of character. And the neighborhood in my opinion is one of the best in Chicago. It's thriving, has claims to many of the city's best restaurants, and just has a really cool neighborhoody-industrial vibe.
The West Loop Recreate: was owned and lived in for the past 25 years by the same couple. That's all I really know. They took great care (and what I imagine pride) in their home because this place was in excellent shape when I purchased it. But the design, is not my taste, which leads me to the massive project I'm about to undertake. There are pieces I will keep and many things that I will change.
The logistics: I have 1300 square feet of living including 2 bedrooms, 2 bathrooms, a kitchen, and a combined living/dining space. And 13 foot ceilings (hello!) with large windows, exposed original brick, and exposed duct work and piping.
The challenges: The obvious updating. Incorporating laundry/laundry room. Adding closets/storage space. Large cement poles. And doing this all on a budget!
The plan: Complete kitchen redo. Updated flooring for the entryway and kitchen. Fireplace overhaul. Partial and complete bathroom remodels. Bedroom cosmetic upgrades. New closets. Laundry, somewhere.
So let's start the "before" tour. (The after will take place room by room, step by step). These photos are courtesy of the home listing (I don't want to get in trouble, so I'm not taking credit for them. Thank you @VHT studios for these photos). Again, this place is what I like to call "vintage". It needs work but I love it all the same. I will take photos of the step by step redos on my own. I currently have tenants, so it's not empty at the moment but I will update my progress soon.
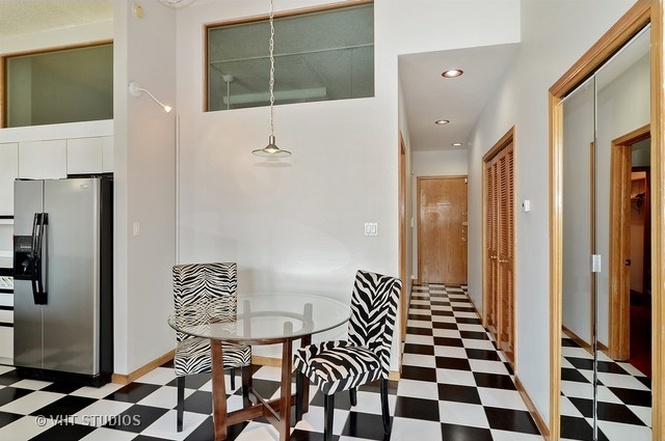
The entryway: we've got vintage black and white tiles happening here.

The kitchen: Can we all say red sink? Gotta love the laminate countertops.

The dining/living area: I fell in love with the exposed brick and natural light. And the beautiful hardwood floors. This Florida girl loves the idea of using an actual fireplace during winters.


Bedroom 1: Both bedrooms have en suite bathrooms. My plan is to make them both "master" suites. Stay tuned.


Bathroom 1: Black and White. I have a great vision for this bathroom and it includes keep the original tile (!)


Bedroom 2: A little smaller than Bedroom 1 but has hardwoods and a larger bathroom.

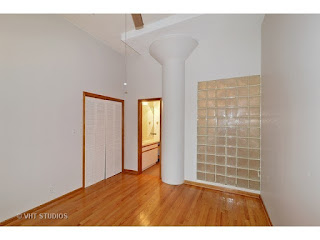
Bathroom 2: Largest.Shower.Ever....

 So that's it for now. This is the start of what I can imagine is going to be challenging (it already has been, we're going to talk about the bathroom in post 2) and extremely rewarding. It will be a place I will get to enjoy and live in (for awhile, forever, who really knows) and maybe a place that someone else will call home as well. And I'm always up for visitors! So stay tuned, we've got a journey ahead!
xo, -Kelli
The Personal: For those of you who know me, you know I haven't stayed put in a place for more than two years (since finishing college). I don't know if it's always the desire for something new or the fact that there's another city and another journey always to be had that gets me closer to finding the true place I'll call home. Sometimes my heartstrings pull me back towards places I have lived (oh how I miss my favorite city DC and crave the beaches of Florida) and sometimes it calls me to want to go somewhere new and unexpected (I've always imagined I'll live in the mountains). Hence the name for this blog. I'm wandering, but I'm not lost. And maybe, just maybe, I'll buy homes along the way.
So let's skip to the present, December 2016 marked 2 years in Chicago. Instead of picking up and moving, I did it. I bought a house. I truly love Chicago. I love the city, I love the people, I love what I have experienced here and I love the person Chicago has shaped me to be. Does this mean I'll stay put in Chicago? Who knows. Does it mean I'll call this home? I'm honestly not sure. But what it does mean is that I get to do something I love. I bought a fixer upper and I get to design and redo it from the floors up. (Insert - what have I gotten myself into?!)
I have always been
The House: So, let me introduce you to my place. For the sake of this blog, I'm going to call it the West Loop Recreate. I'm going to recreate this home and not completely redo it. Why? Because this house has a story and really good bones. It's the reason why I loved it the second I stepped foot inside the door.
The building (I will not disclose location or show photos of the outside - I'm not looking for stalkers here...): used to be a textile factory. It was built after the Great Chicago Fire when most (from what I understand) factories moved and rebuilt on the West side of the city. More true history can be found here http://westloop.org/about/history/. Anyway, the building, according to the Chicago Tribune was built sometime around 1885 (says a plumber who investigated the building before they turned it into condos) and was converted into condos in 1989. So it's old, really old. And I can only imagine holds many stories within its walls. It is filled with concrete, exposed brick, an industrial elevator and tons of character. And the neighborhood in my opinion is one of the best in Chicago. It's thriving, has claims to many of the city's best restaurants, and just has a really cool neighborhoody-industrial vibe.
The West Loop Recreate: was owned and lived in for the past 25 years by the same couple. That's all I really know. They took great care (and what I imagine pride) in their home because this place was in excellent shape when I purchased it. But the design, is not my taste, which leads me to the massive project I'm about to undertake. There are pieces I will keep and many things that I will change.
The logistics: I have 1300 square feet of living including 2 bedrooms, 2 bathrooms, a kitchen, and a combined living/dining space. And 13 foot ceilings (hello!) with large windows, exposed original brick, and exposed duct work and piping.
The challenges: The obvious updating. Incorporating laundry/laundry room. Adding closets/storage space. Large cement poles. And doing this all on a budget!
The plan: Complete kitchen redo. Updated flooring for the entryway and kitchen. Fireplace overhaul. Partial and complete bathroom remodels. Bedroom cosmetic upgrades. New closets. Laundry, somewhere.
So let's start the "before" tour. (The after will take place room by room, step by step). These photos are courtesy of the home listing (I don't want to get in trouble, so I'm not taking credit for them. Thank you @VHT studios for these photos). Again, this place is what I like to call "vintage". It needs work but I love it all the same. I will take photos of the step by step redos on my own. I currently have tenants, so it's not empty at the moment but I will update my progress soon.
The entryway: we've got vintage black and white tiles happening here.
The kitchen: Can we all say red sink? Gotta love the laminate countertops.

The dining/living area: I fell in love with the exposed brick and natural light. And the beautiful hardwood floors. This Florida girl loves the idea of using an actual fireplace during winters.


Bedroom 1: Both bedrooms have en suite bathrooms. My plan is to make them both "master" suites. Stay tuned.


Bathroom 1: Black and White. I have a great vision for this bathroom and it includes keep the original tile (!)


Bedroom 2: A little smaller than Bedroom 1 but has hardwoods and a larger bathroom.


Bathroom 2: Largest.Shower.Ever....


xo, -Kelli
Subscribe to:
Posts (Atom)